Create placeholder text quickly with our Lorem Generator tool. Perfect for designers and developers to fill layouts, previews, and mockups effortlessly.
5 Reasons I Finally Gave My Website a Favicon (and Used Zoviz to Make It)
Okay, tiny icons might sound like the smallest thing ever, but hear me out: adding a professional favicon changed how people interact with my site and here’s exactly how I did it with Zoviz Favicon Generator:
1. Tiny Detail, Big Brand Impact
Favicons help your site stay in tabs instead of just floating among open pages.
2. Super Easy to Create
Zoviz auto-generates multiple sizes (16×16, 32×32, 48×48) from your logo no technical headaches.
3. Transparent Backgrounds
No messy borders stuck around your image. Just clean, crisp icons.
4. Browser-Ready Packages
It gives you .ICO and .PNG versions ready to upload, plus HTML snippet to paste instant pro look.
5. Zero Design Skills Needed
Upload + tweak + download. That’s it. No weird canvas sizes. No guesswork.
Honestly… for the longest time I thought favicons were optional. They’re not. They make your brand feel finished. When someone bookmarks your page or scans through tabs, that little icon hooks attention and Zoviz made it actually good.
From Wireframes to Deployment — The Modern Toolkit
Today’s designers and developers rely on powerful tools to streamline workflows. Here are some essentials for every stage of website creation:
Design & Prototyping: Figma, Adobe XD, Sketch
Development: Visual Studio Code, GitHub, CodePen
Testing & Optimization: Lighthouse, BrowserStack
Deployment: Netlify, Vercel, GitHub Pages
Why Tools Matter
The right tools don’t replace creativity — they enhance it. They help you work faster, collaborate better, and maintain consistent design quality across projects.
How I Made My Website Look Instantly Professional (Without a Designer)
So here’s a confession: I used to ignore favicons. 🙃 You know that tiny little icon next to your website name in the browser tab? Yeah, I never thought it mattered… until I realized it’s the digital equivalent of your brand’s signature.
I tried making one manually — blurry, off-center, and not even square 😩. So I tested a few favicon tools and one completely changed the game.
This thing is pure ✨magic✨ for small business owners, bloggers, and indie creators.
Here’s why it’s literally my go-to now:
⚡ Auto favicon creation: Upload your logo → it auto-resizes + optimizes for all devices.
🧠 Smart clarity scaling: Keeps your icon sharp even at tiny 16x16 sizes.
💻 Multi-format export: Generates all standard favicon files (.ico, .png, .svg) for browsers + mobile.
🖤 Brand consistency: Makes your site look “official” even before it loads.
🔄 One-click integration: Works seamlessly with WordPress, Shopify, Squarespace, etc.
I added my new Zoviz-made favicon and suddenly my site looked… legit. Like brand upgrade legit.
2. Favicon.io
Good for beginners, but lacks detail + design flexibility.
3. RealFaviconGenerator.net
Advanced features, but kinda overwhelming for non-techies.
4. Canva + Manual Resize
Works but not optimized — favicon looks fuzzy on some browsers.
5. Adobe Express
Okay results, but the export setup feels extra.
Takeaway: If you’re building a brand or portfolio, don’t sleep on your favicon. It’s the first impression people subconsciously notice. And honestly, Zoviz Favicon Generator makes it look like you paid a designer when you didn’t.
Your brand deserves to look premium — even in 16 pixels.
I Needed a Favicon That Didn’t Look Like a Template — Here’s What Actually Worked
As someone running a small website and blog, I wanted a favicon that looked professional, not like one of those default, pixelated icons you see everywhere. I tested a few online favicon makers, and here’s what worked best for me:
This one seriously saved me time (and made my site look 10x more professional). Here’s what I loved:
You can upload your brand logo, and it automatically converts it into multiple favicon sizes (for all browsers and devices).
It gives you transparent backgrounds, crisp resolution, and even a preview of how your favicon will look in a browser tab.
There’s no watermark, no weird sizing issues — just clean, fast output that looks like it was made by a pro.
I had my favicon downloaded in under 3 minutes and it matched my site branding perfectly. If you’re running a startup, blog, or online store, Zoviz makes this tiny but important detail incredibly easy to nail.
2. Favicon.io
It’s a solid free tool if you’re working with text or emojis, but the designs can look pretty generic. Good for basic needs but lacks brand personality.
3. RealFaviconGenerator.net
Great customization and technical details, but the interface feels a little outdated and confusing if you’re not a developer.
4. Canva (Favicon via Custom Design)
You can design a favicon manually, but you’ll need to export it in specific sizes and convert it elsewhere. Not the most efficient if you’re looking for a quick solution.
✅ Final Thoughts:
A favicon may be small, but it speaks volumes about your site’s attention to detail. Zoviz’s Favicon Generator made it ridiculously easy to create a high-quality, on-brand icon without touching Photoshop or dealing with technical stuff. I’d recommend it to anyone who wants their site to feel polished without spending hours figuring it out.
Are you struggling to create a stunning website that truly represents your brand? Look no further! EpicPxls is here to revolutionize your design process. Offering hundreds of customizable templates, this platform is a goldmine for anyone looking to elevate their web presence without breaking the bank.
At just $39 for lifetime access, you gain entry to a vast library of premium designs that would normally cost a small fortune. Whether you’re a small business owner, a freelancer, or a passionate content creator, EpicPxls provides the tools you need to create eye-catching websites and landing pages effortlessly.
But the perks don’t stop there. Unlimited updates for life mean that your designs will always stay fresh and modern. Plus, with an intuitive interface, even those with minimal design experience can find their footing quickly.
Curious about whether EpicPxls is right for you? Dive into our detailed blog for an in-depth review and discover how you can unlock your design potential effortlessly. Your dream website is just a click away!
Read the full blog here: [EpicPxls Review](https://jomiruddin.com/epicpxls-lifetime-deal-review-create-beautiful-websites-and-landing-pages-with-customizable-templates/)
#WebDesign #EpicPxls #SmallBusiness #DigitalMarketing #DesignTools #Freelancers #WebsiteTemplates
🎨 Over 10,000+ Premium Themes for all your website needs.
🛠 1,000+ Elementor Kits templates to elevate your WordPress designs.
💻 6,000+ Source Codes across categories:
Laravel
Flutter
PHP
Android
iOS
Desktop applications
💰 All for just $29!
Why Choose This Offer? ✅ Instant access to high-quality resources. ✅ Includes demo download and usage support. ✅ Perfect for businesses, freelancers, and agencies. ✅ Full-time support from our dedicated team on WhatsApp – fast responses guaranteed!
Introducing Alpine.js: A Tiny JavaScript Framework Like most developers, I have a bad tendency to over-complicate my workflow, especially if there’s some new hotness on the horizon. Why use CSS when you can use CSS-in-JS? Why use Grunt when you can use Gulp? Why use Gulp when you can use Webpack? Why use a traditional CMS when you can go headless? Every so often though, the new-hotness makes life simpler. Recently, the rise of utility based tools like Tailwind CSS have done this for CSS, and now Alpine.js promises something similar for JavaScript. In this article, we’re going to take a closer look at Alpine.js and how it can replace JQuery or larger JavaScript libraries to build interactive websites. If you regularly build sites that require a sprinkling on Javascript to alter the UI based on some user interaction, then this article is for you. Throughout the article, I refer to Vue.js, but don’t worry if you have no experience of Vue — that is not required. In fact, part of what makes Alpine.js great is that you barely need to know any JavaScript at all. Now, let’s get started. What Is Alpine.js? According to project author Caleb Porzio: “Alpine.js offers you the reactive and declarative nature of big frameworks like Vue or React at a much lower cost. You get to keep your DOM, and sprinkle in behavior as you see fit.” Let’s unpack that a bit. Let’s consider a basic UI pattern like Tabs. Our ultimate goal is that when a user clicks on a tab, the tab contents displays. If we come from a PHP background, we could easily achieve this server side. But the page refresh on every tab click isn’t very ‘reactive’. To create a better experience over the years, developers have reached for jQuery and/or Bootstrap. In that situation, we create an event listener on the tab, and when a user clicks, the event fires and we tell the browser what to do.
See the Pen Showing / hiding with jQuery by Phil on CodePen.
See the Pen Showing / hiding with jQuery by Phil on CodePen. That works. But this style of coding where we tell the browser exactly what to do (imperative coding) quickly gets us in a mess. Imagine if we wanted to disable the button after it has been clicked, or wanted to change the background color of the page. We’d quickly get into some serious spaghetti code. Developers have solved this issue by reaching for frameworks like Vue, Angular and React. These frameworks allow us to write cleaner code by utilizing the virtual DOM: a kind of mirror of the UI stored in the browser memory. The result is that when you ‘hide’ a DOM element (like a tab) in one of these frameworks; it doesn’t add a display:none; style attribute, but instead it literally disappears from the ‘real’ DOM. This allows us to write more declarative code that is cleaner and easier to read. But this is at a cost. Typically, the bundle size of these frameworks is large and for those coming from a jQuery background, the learning curve feels incredibly steep. Especially when all you want to do is toggle tabs! And that is where Alpine.js steps in.
WANT TO BUILD YOUR BUSINESS APP IN LARAVEL FRAMEWORK? ARKSSTECH,AGILE SOFTWARE DEVELOPMENT COMPANY OFFERS EXPERIENCED LARAVEL APP DEVELOPERS & TO HIRE LARAVEL DEVELOPERS FOR STARTUPS AND SMES. RENT A CODER TODAY!! Like Vue and React, Alpine.js allows us to write declarative code but it uses the “real” DOM; amending the contents and attributes of the same nodes that you and I might edit when we crack open a text editor or dev-tools. As a result, you can lose the filesize, wizardry and cognitive-load of larger framework but retain the declarative programming methodology. And you get this with no bundler, no build process and no script tag. Just load 6kb of Alpine.js and you’re away! Alpine.js JQuery Vue.js React + React DOM Coding style Declarative Imperative Declarative Declarative Requires bundler No No No Yes Filesize (GZipped, minified) 6.4kb 30kb 32kb 5kb + 36kb Dev-Tools No No Yes Yes WANT TO BUILD YOUR BUSINESS APP IN LARAVEL FRAMEWORK? ARKSSTECH,AGILE SOFTWARE DEVELOPMENT COMPANY OFFERS EXPERIENCED LARAVEL APP DEVELOPERS & TO HIRE LARAVEL DEVELOPERS FOR STARTUPS AND SMES. RENT A CODER TODAY!! When Should I Reach For Alpine? For me, Alpine’s strength is in the ease of DOM manipulation. Think of those things you used out of the box with Bootstrap, Alpine.js is great for them. Examples would be: Showing and hiding DOM nodes under certain conditions, Binding user input, Listening for events and altering the UI accordingly, Appending classes. You can also use Alpine.js for templating if your data is available in JSON, but let’s save that for another day. When Should I Look Elsewhere? If you’re fetching data, or need to carry out additional functions like validation or storing data, you should probably look elsewhere. Larger frameworks also come with dev-tools which can be invaluable when building larger UIs. From jQuery To Vue To Alpine Two years ago, Sarah Drasner posted an article on Smashing Magazine, “Replacing jQuery With Vue.js: No Build Step Necessary,” about how Vue could replace jQuery for many projects. That article started me on a journey which led me to use Vue almost every time I build a user interface. Today, we are going to recreate some of her examples with Alpine, which should illustrate its advantages over both jQuery and Vue in certain use cases. Alpine’s syntax is almost entirely lifted from Vue.js. In total, there are 13 directives. We’ll cover most of them in the following examples. Getting Started Like Vue and jQuery, no build process is required. Unlike Vue, Alpine it initializes itself, so there’s no need to create a new instance. Just load Alpine and you’re good to go. The scope of any given component is declared using the x-data directive. This kicks things off and sets some default values if required: … Capturing User Inputs x-model allow us to keep any input element in sync with the values set using x-data. In the following example, we set the name value to an empty string (within the form tag). Using x-model, we bind this value to the input field. By using x-text, we inject the value into the innerText of the paragraph element. This highlights the key differences with Alpine.js and both jQuery and Vue.js. Updating the paragraph tag in jQuery would require us to listen for specific events (keyup?), explicitly identify the node we wish to update and the changes we wish to make. Alpine’s syntax on the other hand, just specifies what should happen. This is what is meant by declarative programming. Updating the paragraph in Vue while simple, would require a new script tag: new Vue({ el: ’#app’, data: { name: “ } }); While this might not seem like the end of the world, it highlights the first major gain with Alpine. There is no context-switching. Everything is done right there in the HTML — no need for any additional JavaScript. Click Events, Boolean Attributes And Toggling Classes Like with Vue, : serves as a shorthand for x-bind (which binds attributes) and @ is shorthand for x-on (which indicates that Alpine should listen for events). In the following example, we instantiate a new component using x-data, and set the default value of show to be false. When the button is clicked, we toggle the value of show. When this value is true, we instruct Alpine to append the aria-expanded attribute. x-bind works differently for classes: we pass in object where the key is the class-name (active in our case) and the value is a boolean expression (show). WANT TO BUILD YOUR BUSINESS APP IN LARAVEL FRAMEWORK? ARKSSTECH,AGILE SOFTWARE DEVELOPMENT COMPANY OFFERS EXPERIENCED LARAVEL APP DEVELOPERS & TO HIRE LARAVEL DEVELOPERS FOR STARTUPS AND SMES. RENT A CODER TODAY!! Hiding And Showing The syntax showing and hiding is almost identical to Vue. This will set a given DOM node to display:none. If you need to remove a DOM element completely, x-if can be used. However, because Alpine.js doesn’t use the Virtual DOM, x-if can only be used on a (tag that wraps the element you wish to hide). Magic Properties In addition to the above directives, three Magic Properties provide some additional functionality. All of these will be familiar to anyone working in Vue.js. $el fetches the root component (the thing with the x-data attribute); $refs allows you to grab a DOM element; $nextTick ensures expressions are only executed once Alpine has done its thing; $event can be used to capture a nature browser event.
Let’s Build Something Useful
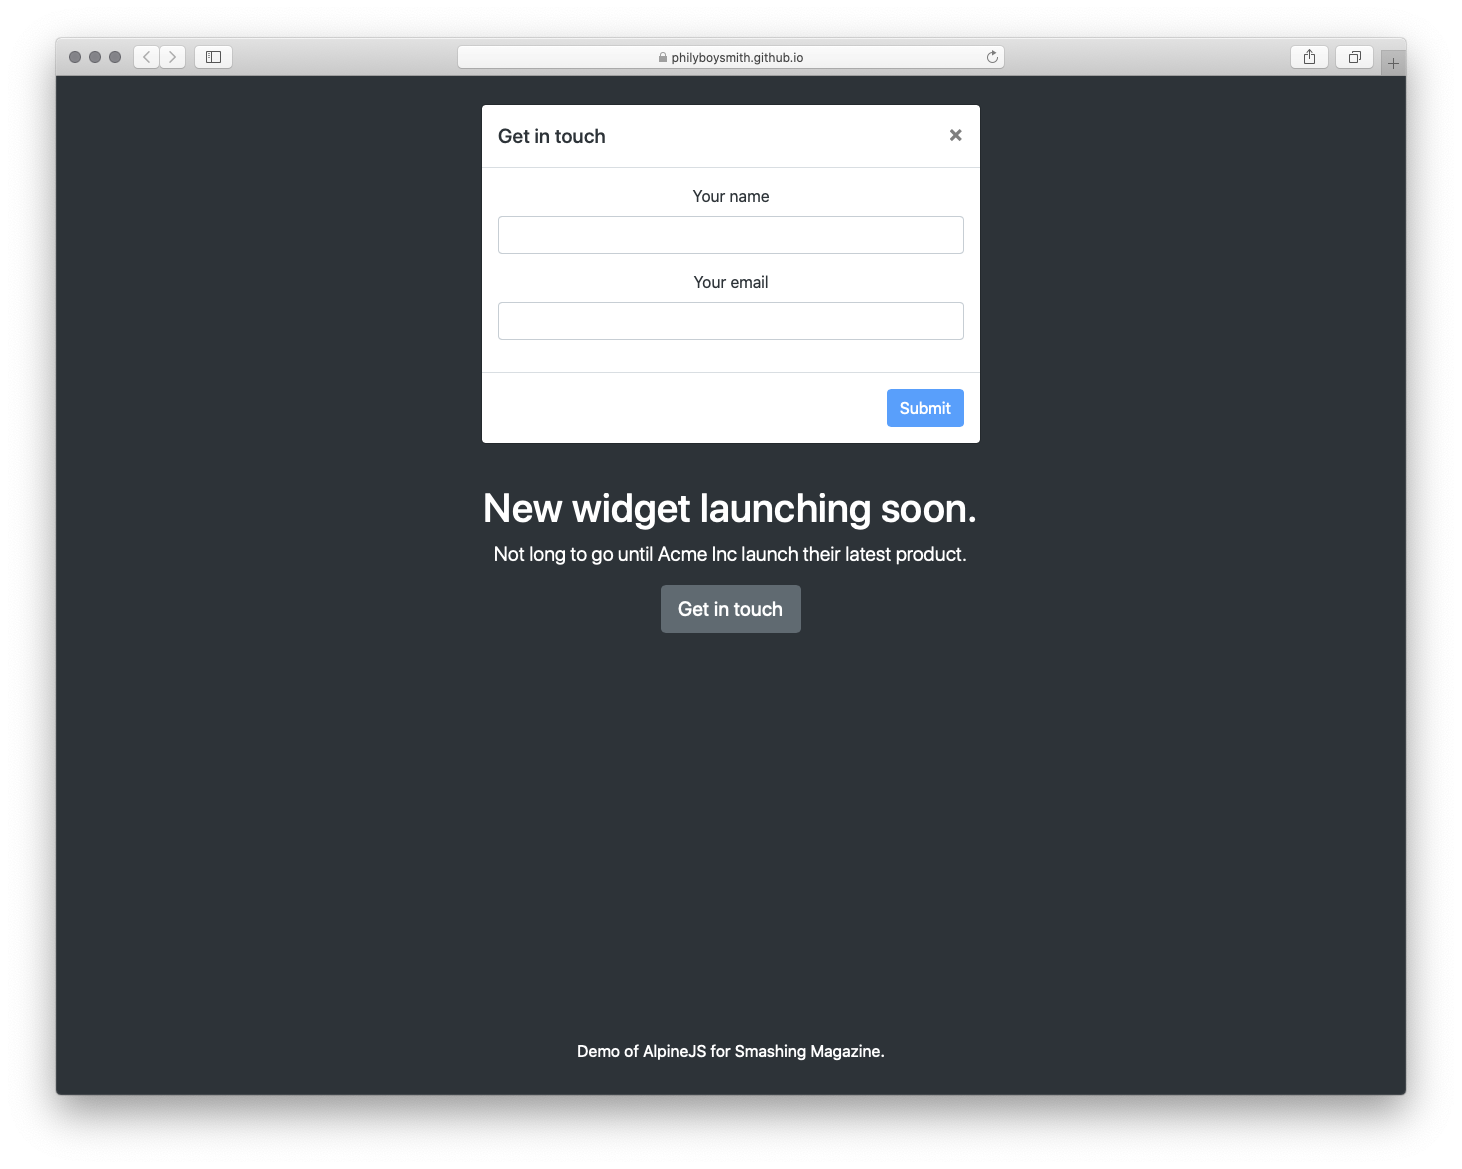
It’s time to build something for the real world. In the interests of brevity I’m going to use Bootstrap for styles, but use Alpine.js for all the JavaScript. The page we’re building is a simple landing page with a contact form displayed inside a modal that submits to some form handler and displays a nice success message. Just the sort of thing a client might ask for and expect pronto!
To make this work, we could add jQuery and Bootstrap.js, but that is quite a bit of overhead for not a lot of functionality. We could probably write it in Vanilla JS, but who wants to do that? Let’s make it work with Alpine.js instead. First, let’s set a scope and some initial values: Now, let’s make our button set the showModal value to true: Get in touch When showModal is true, we need to display the modal and add some classes: Let’s bind the input values to Alpine: And disable the ‘Submit’ button, until those values are set: Submit Finally, let’s send data to some kind of asynchronous function, and hide the modal when we’re done: Submit And that’s about it!
Just Enough JavaScript
When building websites, I’m increasingly trying to ask myself what would be “just enough JavaScript”? When building a sophisticated web application, that might well be React. But when building a marketing site, or something similar, Alpine.js feels like enough. (And even if it’s not, given the similar syntax, switching to Vue.js takes no time at all). It’s incredibly easy to use (especially if you’ve never used VueJS). It’s tiny ( There are more advanced features that aren’t included in this article and Caleb is constantly adding new features. If you want to find out more, take a look at the official docs on Github. WANT TO BUILD YOUR BUSINESS APP IN LARAVEL FRAMEWORK? ARKSSTECH,AGILE SOFTWARE DEVELOPMENT COMPANY OFFERS EXPERIENCED LARAVEL APP DEVELOPERS & TO HIRE LARAVEL DEVELOPERS FOR STARTUPS AND SMES. RENT A CODER TODAY!!
Every week BytesWire team brings fresh tools of the week for designers and developers. These tools will not only help you to accomplish your design tasks.
When designing in Adobe Photoshop it’s sometimes handy to have effective Photoshop Plugins to help boost our workflow and creativity. Photoshop is a fantastic Graphic Design tool used by many to create websites, graphics and photographs. There are some fantastic premium and free Photoshop Plugins you can download today, already Photoshop is packed full of useful tools, sometimes we can install new photoshop plugins to help improve your design needs.


